[实验] MariaDB & MySQL 主从同步的搭建 (互为主从)

纪念:站主于 2019 年 11 月完成了此开源实验,并将过程中的所有命令经过整理和注释以后,形成以下教程

步骤一:规划拓扑

1.1 服务器列表

数据库服务器 21 IP 地址:192.168.1.21
数据库服务器 22 IP 地址:192.168.1.22

1.2 服务器列表简介

数据库服务器 21 和 数据库服务器 22 相互同步对方的数据

步骤二:系统环境要求

1) 所有服务器的系统都需要是 CentOS 7 版本
2) 所有服务器都要关闭防火墙
3) 所有服务器都要关闭 SELinux
4) 所有服务器系统都要配置好可用的软件源
5) 需要按照拓扑图给对应的服务器配置好 IP 地址和主机名
6) 所有服务器都要可以相互 ping 通自己和对方的 IP 地址和主机名

步骤三:所有数据库服务器安装 MariaDB 或 MySQL 数据库

3.1 所有数据库服务器安装 MariaDB 或 MySQL

(分别在数据库服务器 21 和数据库服务器 22 上执行以下步骤)

# yum -y install mariadb-server

(补充:这里以安装 MariaDB 数据库为例)

3.2 设置所有数据库服务器开机自启 MariaDB 或 MySQL

(分别在数据库服务器 21 和数据库服务器 22 上执行以下步骤)

# systemctl enable mariadb

(补充:这里以开机自启 MariaDB 数据库为例)

步骤四:配置 MairaDB & MySQL 互为主从结构

4.1 将数据库服务器 22 设置为数据库服务器 21 的从库

4.1.1 开启数据库服务器 21 的 server-id 和 binlog 日志

(只在数据库服务器 21 上执行以下步骤)

# vi /etc/my.cnf

将部分内容修改如下:

[mysqld]
server-id=1
log-bin=mariadb-bin
......


补充:这里以
1) 将 server-id 设置为 1
2) 启动 binlog 日志,并将 binlog 日志的前缀设置为 mariadb-bin
为例

(注意: 集群里的各个数据库的 server id 不能一样)

4.1.2 重启数据库服务器 21 的数据库

(只在数据库服务器 21 上执行以下步骤)

# systemctl restart mariadb

(补充:这里以重启 MariaDB 数据库为例)

4.1.3 在数据库服务器 21 的数据库中创建用于同步的用户
4.1.3.1 进入数据库

(只在数据库服务器 21 上执行以下步骤)

# mysql -p
4.1.3.2 创建数据库服务器 21 用于被数据库服务器 22 同步的 MariaDB 用户

(只在数据库服务器 21 上执行以下步骤)

> grant replication slave on *.* to 'backup'@'192.168.1.22' identified by 'backup';
4.1.3.3 刷新数据库服务器 21 里所有用户的权限

(只在数据库服务器 21 上执行以下步骤)

> flush privileges;
4.1.3.4 显示数据库服务器 21 的 MariaDB 的主库参数

(只在数据库服务器 21 上执行以下步骤)

> show master status;
+--------------------+----------+--------------+------------------+
| File               | Position | Binlog_Do_DB | Binlog_Ignore_DB |
+--------------------+----------+--------------+------------------+
| mariadb-bin.000003 |      475 |              |                  |
+--------------------+----------+--------------+------------------+
1 row in set (0.00 sec)

(补充:这里显示的 master_log_file 和 master_log_pos 的参数会在后面配置从库中使用)

4.1.4 让数据库服务器 22 同步数据库服务器 21
4.1.4.1 启动数据库服务器 22

(只在数据库服务器 22 上执行以下步骤)

# systemctl start mariadb

(补充:这里以启动 MariaDB 数据库为例)

4.1.4.2 进入数据库服务器 22 的数据库

(只在数据库服务器 22 上执行以下步骤)

# mysql -p
4.1.4.3 同步主库

(只在数据库服务器 22 上执行以下步骤)

> change master to master_host="192.168.1.21",master_user='backup',master_password='backup',master_log_file='mariadb-bin.000003',master_log_pos=475;
4.1.4.4 启动从库状态

(只在数据库服务器 22 上执行以下步骤)

> start slave;
4.1.4.5 显示从库状态

(只在数据库服务器 22 上执行以下步骤)

> show slave status\G;
          Master_Host: 192.168.1.21
              ......
          Slave_IO_Running: Yes  
          Last_IO_Error: ......
              ......
          Slave_SQL_Running: Yes
          Last_SQL_Error: ......
              ......

(补充:这里显示它的主服务器是 192.168.1.21)

(注意:这里要确保 Slave_IO_Running: 和 Slave_SQL_Running: 后面没有报错信息)

4.2 将数据库服务器 21 设置为数据库服务器 22 的从库

4.2.1 关闭数据库服务器 22 的数据库

(只在数据库服务器 22 上执行以下步骤)

# systemctl stop mariadb

(补充:这里以停止 MariaDB 数据库为例)

4.2.2 开启数据库服务器 21 的 server-id 和 binlog 日志

(只在数据库服务器 22 上执行以下步骤)

# vi /etc/my.cnf

(将部分内容修改如下)

[mysqld]
server-id=2
log-bin=mariadb-bin
......


补充:这里以
1) 将 server-id 设置为 2
2) 启动 binlog 日志,并将 binlog 日志的前缀设置为 mariadb-bin
为例

(注意: 集群里的各个数据库的 server id 不能一样)

4.2.3 启动数据库服务器 22 的数据库

(只在数据库服务器 22 上执行以下步骤)

# systemctl start mariadb

(补充:这里以重启 MariaDB 数据库为例)

4.2.4 在数据库服务器 22 的数据库中创建用于同步的用户
4.2.4.1 进入数据库

(只在数据库服务器 22 上执行以下步骤)

# mysql -p
4.2.4.2 创建数据库服务器 21 用于被数据库服务器 22 同步的 MariaDB 用户

(只在数据库服务器 22 上执行以下步骤)

> grant replication slave on *.* to 'backup'@'192.168.1.21' identified by 'backup';
4.2.4.3 刷新数据库服务器 22 数据库里所有用户的权限

(只在数据库服务器 22 上执行以下步骤)

> flush privileges;
4.2.4.4 显示数据库服务器 22 的 MariaDB 的主库参数

(只在数据库服务器 22 上执行以下步骤)

> show master status;
+--------------------+----------+--------------+------------------+
| File               | Position | Binlog_Do_DB | Binlog_Ignore_DB |
+--------------------+----------+--------------+------------------+
| mariadb-bin.000003 |      475 |              |                  |
+--------------------+----------+--------------+------------------+
1 row in set (0.00 sec)

(补充:这里显示的 master_log_file 和 master_log_pos 的参数会在后面配置从库中使用)

4.2.5 让数据库服务器 21 同步数据库服务器 22
4.2.5.1 进入数据库服务器 21 的数据库

(只在数据库服务器 21 上执行以下步骤)

# mysql -p
4.2.5.2 同步主库

(只在数据库服务器 21 上执行以下步骤)

> change master to master_host="192.168.1.22",master_user='backup',master_password='backup',master_log_file='mariadb-bin.000003',master_log_pos=475;
4.2.5.3 启动从库状态

(只在数据库服务器 21 上执行以下步骤)

> start slave;
4.2.5.4 显示从库状态

(只在数据库服务器 21 上执行以下步骤)

> show slave status\G;
          Master_Host: 192.168.1.22
              ......
          Slave_IO_Running: Yes  
          Last_IO_Error: ......
              ......
          Slave_SQL_Running: Yes
          Last_SQL_Error: ......
              ......

(补充:这里显示它的主服务器是 192.168.1.21)

(注意:这里要确保 Slave_IO_Running: 和 Slave_SQL_Running: 后面没有报错信息)

步骤五:测试 MariaDB & MySQL 互为主从集群

5.1 进入数据库

(分别在数据库服务器 21 和数据库服务器 22 上执行以下步骤)

# mysql -uroot -p

5.2 创建测试库

(只在数据库服务器 21 上执行以下步骤)

> create database test1;

5.3 进入测试库

(分别在数据库服务器 21 和数据库服务器 22 上执行以下步骤)

> use test1;

5.4 创建测试表

(只在数据库服务器 21 上执行以下步骤)

> create table test1a(id int(10),name char(100),age int(10));

(补充:这里随意创建了一张表格)

5.5 在数据库服务器 21 上插入测试数据

(只在数据库服务器 21 上执行以下步骤)

> insert into test1a(id,name,age) values('1','zmy','10');

(补充:这里随意插入了一条数据)

5.6 在数据库服务器 22 上插入测试数据

(只在数据库服务器 22 上执行以下步骤)

> insert into test1a(id,name,age) values('2','ming','20');

(补充:这里随意插入了一条数据)

5.7 在两个数据库里都可以看到对方插入的测试数据

(分别在数据库服务器 21 和数据库服务器 22 上执行以下步骤)

> select * from test1a;
+------+------+------+
| id   | name | age  |
+------+------+------+
|    1 | zmy  |   10 |
|    2 | ming |   20 |
+------+------+------+
2 rows in set (0.00 sec)
[步骤] WordPress 数据库的修复 (通过 WordPress 官方修复工具实现)

步骤一:修改网页文件 wp-config.php

1.1 修改使用默认源码安装的 Nginx 网页文件的方法

# vim /usr/local/nginx/html/wp-config.php

添加以下内容:

......
define('WP_ALLOW_REPAIR', true);
?>

1.2 修改使用 CentOS&RHEL yum 默认安装的 Nginx 网页的方法

# vim /usr/share/nginx/html/wp-config.php

添加以下内容:

......
define('WP_ALLOW_REPAIR', true);
?>

步骤二:在图形浏览器上输入以下网址

<website>/wp-admin/maint/repair.php

步骤三:根据网页提示修复数据库

(步骤略)

[工具] Shell 半自动化部署 LNMP 平台 + SSL (CentOS Linux 7 版)

介绍

基本信息

作者:朱明宇
脚本名称:半自动化部署 LNMP 平台 + SSL
作用:半自动化安装 LNMP,即 Nginx、Mariadb、PHP、php-fpm,实现 HTTPS

使用方法

为了安全起见,设置系统用户和数据库用户和数据库权限的工作请按照脚本最后的步骤进行手动设置

注意

1. 执行本脚本之前请确保 Nginx、PHP、网站程序文件、SQL、SSL 的公钥、SSL 的私钥、shell、本脚本 8 个文件,如果是新建网站的话,不用准备 SQL 文件
2. Nginx 文件:请将 Nginx 源码安装包放在 /root/
3. PHP 文件:请将 PHP 源码安装包放在 /root/
4. 网站程序文件:请将网站程序文件的名字中包含“eternalcenter-backup-”字段,并且是 tar 包,并放在 /root/
5. SQL 文件:如果是恢复网站的话,请将备份的数据文件 *.sql 放在 /root/,注意这是一个 MySQL 备份文件
6. SSL 的公钥文件和 SSL 私钥文件:请将网站安全证书的公钥和私钥分别命名为:eternalcenter.com.crt 和 eternalcenter.com.key,并放在 /root/
7. shell 文件:请将监控脚本命名为 port_monitoring.sh 并放在 /root/
8. 除此之外 /root/ 目录下请不要放任何文件
9. 服务器的系统需要是 CentOS 7 版本
10. 服务器系统要配置好可用的软件源(最好是软件数量最多的官方版本)
11. 服务器要能够连接外网

补充

1. Nginx 下载网址:https://nginx.org/
2. PHP 下载网址:https://www.php.net/downloads.php
3. WordPress 是一款开源的 php 网站程序,建议使用,下载网址:https://cn.wordpress.org/download/
4. 网站安全证书的公钥和私钥可以在这里申请:https://freessl.cn/

其他

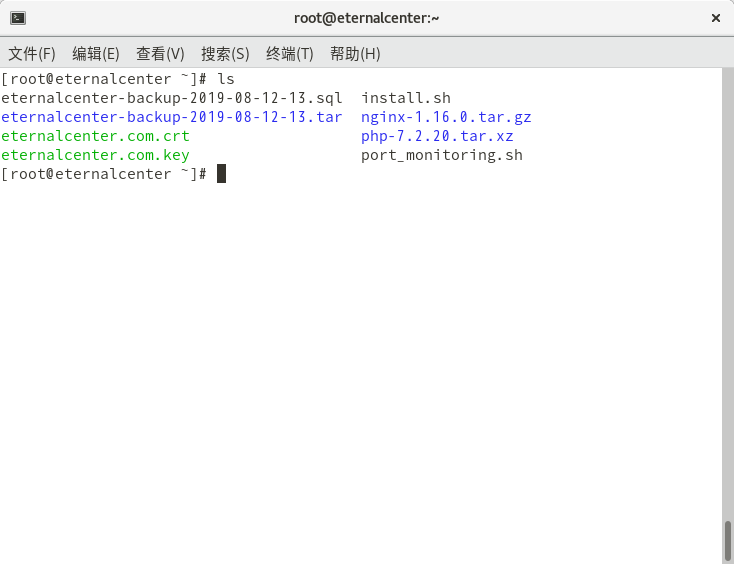
  运行此脚本所需要的文件如下,请尽量使用图中的命名规则给他们命名,并将他们全部放在 /root/ 目录下,请保证 /root/ 下有且仅有这些文件,并以 root 的身份运行,否则脚本会执行失败。其中:

  eternalcenter-backup-2019-08-12-13.sql 指的是 mariadb 的数据库备份文件,如果是新建网站的话可以不要。

  eternalcenter-backup-2019-08-13.tar 指的是网页程序的压缩包,必须是 tar 格式,如果是新建的网站的话,这个也可以换成,新网站的网页程序。

  eternalcenter.com.crt 指的是网站的公钥,需要单独申请,方法可以在搜索引擎上搜索。

  eternalcenter.com.key 指的是网站的私钥,需要单独申请,方法可以在搜索引擎上搜索。

  install.sh 就是指的本脚本。

  nginx-1.16.0.tar.gz 指的是 nginx 的源码安装包,这里的 -1.16.0.tar.gz 可以任意命名,只用保证这个文件名字里包含 nginx 就行了,这个文件可以在 nginx 官网上下载。

  php-7.2.2-.tar.xz 指的是 php 的源码安装包,同样 这里的 -7.2.2-tar.xz 可以任意命名,只用保证这个文件名字包含 php 就行了,这个文件可以在 php 官网上下载。

  port_monitoring.sh 只是一个监控端口的脚本,可以不要,使用者可以根据自我需求写一个,站主是通过这个脚本定期检查并自动启动需要启动但是没有启动的端口,关闭不需要但是启动了的端口。

脚本

#!/bin/bash

# variable initialization
cd
nginxp=`ls | grep "nginx"`
phpp=`ls | grep "php"`
webp=`ls | egrep "eternalcenter-backup-.*tar$"`
nginxr=${nginxp%%.tar*}
phpr=${phpp%%.tar*}


# upgrade system
yum makecache
yum -y update

yum clean all
yum repolist


# remove useless software
yum -y remove php*

yum -y remove mariadb*

systemctl stop postfix
yum -y remove postfix

systemctl stop chronyd
yum -y remove chrony

yum -y update


# install dependency package
yum -y install gcc pcre-devel openssl-devel libxml2-devel curl-devel libpng libpng-devel


# install nginx
cd
tar -xvf $nginxp -C /root/
cd $nginxr

useradd -s /sbin/nologin nginx
./configure --user=nginx --group=nginx --with-http_ssl_module
make && make install
echo 'worker_processes  1;

events {
    worker_connections  65536;
}

http {
    limit_req_zone $binary_remote_addr zone=one:10m rate=1r/s;
    include       mime.types;
    default_type  application/octet-stream;

    sendfile        on;

    keepalive_timeout  65;

    server {
        listen       80;
        limit_req zone=one burst=5;
        server_name www.eternalcenter.com eternalcenter.com;

        rewrite ^/(.*)$ https://eternalcenter.com/$1 permanent;
      
        error_page   500 502 503 504  /50x.html;
        location = /50x.html {
            root   html;
        }

        }

    server {
        listen       443 ssl;
        server_name www.eternalcenter.com eternalcenter.com;

        if ($request_method !~ ^(GET|POST)$){
        return 444;
        }

        ssl_certificate      /usr/local/nginx/ssl/eternalcenter.com.crt;
        ssl_certificate_key  /usr/local/nginx/ssl/eternalcenter.com.key;

        ssl_session_cache    shared:SSL:1m;
        ssl_session_timeout  5m;

        ssl_ciphers  HIGH:!aNULL:!MD5;
        ssl_prefer_server_ciphers  on;

        location ~ \.php$ {
            fastcgi_pass 127.0.0.1:9000;
            include fastcgi.conf;
        } 

        location / {
        root html;
        index index.php index.html index.htm;
        }

        location ~ ^/\.user\.ini {
        deny all;
        }
    
        location ~*\.(jpd|jpeg|gif|png|css|js|ico|xml)$ {
        expires 30d;
        }

        error_page  404              /404.html;
        }

        gzip on;
	gzip_min_length 1000;
	gzip_comp_level 4;
	gzip_types text/plain test/css application/json application/x-javascript text/xml application/xml
	application/xml+rss text/javascripts;

	client_header_buffer_size 1k;
	large_client_header_buffers 4 4k;

	open_file_cache max=2000 inactive=20s;
	open_file_cache_valid  60s;
	open_file_cache_min_uses 5;
	open_file_cache_errors off;

}' > /usr/local/nginx/conf/nginx.conf
cd
mkdir /usr/local/nginx/ssl
mv eternalcenter.com.crt /usr/local/nginx/ssl
mv eternalcenter.com.key /usr/local/nginx/ssl

# install php
cd
tar -xvf $phpp -C /root/
cd $phpr
useradd -s /sbin/nologin php-fpm 
./configure --with-config-file-path=/usr/local/php/etc --enable-fpm --with-fpm-user=php-fpm --with-fpm-group=php-fpm --prefix=/usr/local/php --with-mysqli=mysqlnd --with-pdo-mysql=mysqlnd --enable-mysqlnd --enable-mbstring --with-curl --with-gd --with-zlib
make && make install
cp /usr/local/php/etc/php-fpm.conf.default /usr/local/php/etc/php-fpm.conf
cp /usr/local/php/etc/php-fpm.d/www.conf.default /usr/local/php/etc/php-fpm.d/www.conf
chown -R php-fpm:php-fpm /usr/local/nginx/html/

# install mariadb
yum -y install mariadb mariadb-server mariadb-devel
sed -i "/^datadir/a log_bin=ec" /etc/my.cnf
sed -i "/^datadir/a binlog_format="mixed"" /etc/my.cnf
sed -i "/^datadir/a server_id=51" /etc/my.cnf
systemctl enable mariadb

# deploy web software
cd
rm -rf /usr/local/nginx/html/*
mkdir websoftcache
tar -xvf $webp -C websoftcache
cd websoftcache
websoftcachen=`ls | wc -l`

if [ $websoftcachen -ne 1 ];then
        cd
        tar -xvf $webp -C /usr/local/nginx/html/
else
        webdir=`ls`
        cd $webdir
        mv * /usr/local/nginx/html/
fi

chown -R php-fpm:php-fpm /usr/local/nginx/html

# recover database
systemctl start mariadb
cd
mysql -uroot < *.sql &> /dev/null
systemctl stop mariadb

# set the concurrency number accepted by the system to 65535
echo '* soft nofile 65535
* hard nofile 65535' >> /etc/security/limits.conf

# open firewall port
firewall-cmd --add-port=80/tcp --permanent
firewall-cmd --add-port=443/tcp --permanent
systemctl restart firewalld

# move the monitoring scripts that need to be used regularly to the specified location(/root/shell/port_monitoring.sh you need to write it yourself)
mkdir /shell
mv port_monitoring.sh /shell
chmod u+x /shell/*

# set up regular automatic running monitoring script(/root/shell/port_monitoring.sh you need to write it yourself)
echo '*/1 * * * * root /shell/port_monitoring.sh' >> /etc/crontab

# add another user(for data backup)
useradd zhumingyu
mkdir /cache
chown -R zhumingyu:zhumingyu /cache

# delete redundant files
cd
rm -rf *

# restart the server
reboot

[工具] Shell 批量修改多个 MySQL root 的初始密码

介绍

基本信息

作者:朱明宇
名称:批量修改多个 MySQL root 的初始密码
作用:批量修改多个 MySQL root 的初始密码

使用方法

1. 确认 MariaDB&MySQL 已提前装好
2. 在此脚本的分割线内写入相应的内容
3. 给此脚本添加执行权限
4. 执行此脚本

脚本分割线里的变量

1. nm=192.168.4.0 #网段,网段必须为 C 类网段,请保证格式和前三个网络位一定正确
2. sip=51 #起始 ip,ip 的范围是 0-255
3. lip=53 #结束 ip,ip 的范围是 0-255
4. pd=123456 #想要修改的 MySQL 密码,至少必须要 6 个数

注意

此脚本执行前必须要先保证执行本脚本的用户能无密码 ssh 远程这些远程服务器

脚本

#!/bin/bash

####################### Separator ########################

nm=192.168.4.0
sip=51
lip=53
pd=123456

####################### Separator ########################

fnm=${nm%.*}

set timeout 3

rpm -q expect

if [ $? -ne 0 ];then
        yum -y install expect &> /dev/null
fi

for i in `seq $sip $lip`
do

        echo $fnm.$i

        ssh $fnm.$i 'grep validate_password_policy=0 /etc/my.cnf'
        if [ $? -ne 0 ];then
                ssh $fnm.$i 'sed -i "/^\[mysqld\]$/a validate_password_policy=0" /etc/my.cnf'
        fi

        ssh $fnm.$i 'grep validate_password_length=6 /etc/my.cnf'
        if [ $? -ne 0 ];then
                ssh $fnm.$i 'sed -i "/^\[mysqld\]$/a validate_password_length=6" /etc/my.cnf'
        fi

        ssh $fnm.$i 'systemctl restart mysqld'

        a=`ssh $fnm.$i "grep 'password is generated for root@localhost' /var/log/mysqld.log" |tail -1 | awk '{print $NF}'`

        expect << EOF
        spawn ssh $fnm.$i "mysqladmin -uroot -p password $pd "
        expect "Enter password:"            {send "$a\r"}
        expect "#"                          {send "\r"}
        EOF

done